The first sign is usually subtle. A thin line of light along the floor when the garage door is closed. Easy to dismiss. Then you notice the leaves that somehow keep appearing just inside the door. Then the field mouse that's been living in your garage wall shows up, and you start wondering how it got in. Then winter comes and you realize you're heating the neighborhood through a quarter-inch gap running sixteen feet across the bottom of your garage door.
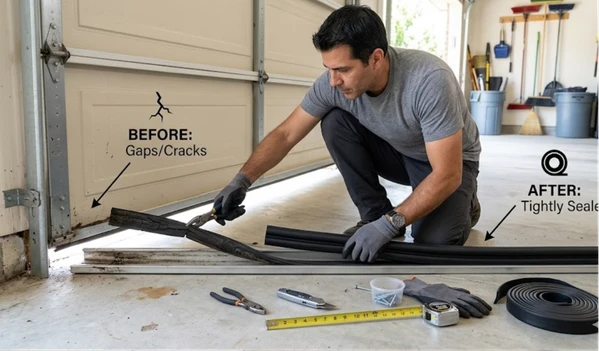
Replacing the garage door bottom seal is legitimately one of the easiest maintenance jobs you can do on a garage door. Thirty to sixty minutes, basic tools, materials that cost $15 to $50 depending on door width. Most people who hesitate on this one have never actually done it - because once you've done it, you realize what you were putting off was an afternoon errand, not a project.
Before you buy anything: figure out what seal type you have
This is where people get tripped up. There are several profile types and they are not interchangeable. Buying the wrong one means another hardware store trip.
T-style (T-type) - The most common residential seal. Has a T-shaped top that slides into an aluminum retainer channel attached to the bottom of the door. The bottom of the T sits in the channel and the rubber or vinyl flap hangs down and compresses against the floor. Most homes built in the last three decades have this style.
J-type (bead-end) - Has a rounded bead on one or both ends that snaps into a single-track retainer channel. Less common than T-style but not rare. The profile looks like a J when viewed from the end.
Bulb or tube seal - A rounded tube of rubber that compresses against the floor. Works well on uneven or sloped surfaces because the bulge distributes the seal pressure across variations in floor level. You often see this on older doors or in garages where the driveway has a slight slope.
Beaded seal - Fits into a double-track retainer with a bead on each end. Specifically matched to that retainer style.
How to identify yours: Open the door fully and look at the metal channel running along the bottom edge. If it has a single slot, you likely have a T-style or bead-end seal. If it has two parallel grooves, it's a beaded retainer. If you see no metal channel and the old rubber is nailed or stapled directly to the door, that's a different situation - you'll need to install a retainer channel along with the new seal, or use a nail-on replacement strip.
The simplest approach: cut off a two-inch piece of your old seal and bring it to the hardware store. Don't describe it - show it. And while you're at it, photograph the retainer channel with your phone before you leave the house.
One thing to check before you order
The retainer channel - the aluminum track the seal slides into - is worth inspecting before you buy the seal. If the retainer is bent, corroded, or has sharp edges from rust, a new seal will slide in poorly and may tear on installation. A visibly damaged retainer should be replaced at the same time as the seal.
A rusted retainer also makes the new seal much harder to slide in - the friction against corroded aluminum is significant. On a fresh clean retainer, installation is smooth. On a pitted, rough one, it's a fight. Worth knowing before you start.
What you need
Nothing exotic here. Most of this is probably already in the garage:
- New bottom seal (correct type and profile for your door, measured to door width plus about an inch on each side)
- Utility knife or heavy scissors for trimming
- Flat-head screwdriver
- Pliers
- A spray bottle with soapy water (dish soap and water - this is the single most useful trick in the whole process)
- Rags
- C-clamps or locking pliers (optional but useful for securing the door)
- Cordless drill if your retainer has screws
Step-by-step replacement
Step 1 - Unplug the opener and open the door
Don't skip the unplugging. Open the door fully - you want maximum access to the bottom edge. If you're working alone, clamp a pair of locking pliers onto the vertical track just below the bottom roller so the door can't slide down unexpectedly.
Step 2 - Remove the old seal
Look at one end of the retainer channel. There's usually an end cap or a crimped section that keeps the seal from sliding out. Use a flat-head screwdriver to pry out the end cap, or uncrimp the channel end with pliers. Once the end is open, grab the old seal and pull it sideways out of the channel.
If it doesn't slide: the rubber has bonded to the retainer over years of compression and temperature cycling. Use pliers for a better grip and work it out in sections. If it's really stuck, cut it into foot-long segments with the utility knife and remove each piece individually. Don't try to muscle the whole thing out at once - you'll damage the retainer.
Step 3 - Clean the retainer channel
Once the old seal is out, wipe the inside of the channel with a rag. Years of compressed dirt, rubber fragments, and grime accumulate in there. A clean channel means the new seal slides in easily and seats properly.
Step 4 - Spray the channel with soapy water
This is the tip that makes the whole job easier. Spray a generous amount of the dish soap and water mixture inside the retainer channel and along the T-rail of the new seal. The soap acts as a lubricant that dramatically reduces the friction as you slide the seal in. Without it, you're fighting rubber against bare aluminum for sixteen feet. With it, the seal glides.
Step 5 - Feed the new seal in
Starting at one end of the retainer, push the T-edge (or bead, depending on your seal type) into the channel opening. Work your way across the door in 12-inch increments, pushing the seal into the track as you go. Keep the seal straight - if it twists inside the channel, back it out a foot and straighten before continuing.
For a double-car door (16 feet wide), a second person holding the loose seal while you feed it in makes a significant difference. The seal wants to sag and twist if you're managing the whole length solo.
Step 6 - Center and trim
Once the seal is fully through the channel, pull it so there's roughly equal overhang on both ends - about half an inch to an inch on each side. Use the utility knife to trim any excess flush with the door edge or leave a small overhang that can be folded back into the channel.
Step 7 - Secure the ends
Re-crimp the channel ends with pliers to prevent the seal from sliding out during door operation. Alternatively, drive a small self-tapping screw through the retainer channel into the seal end on each side. Either method locks the seal in place.
Step 8 - Test before you reconnect anything
With the door still manually held open, lower it by hand and check the seal contact with the floor. Walk the length of the door and look for even contact. Check both ends - those are where uneven floors most commonly show gaps. Check the center of the door too.
If one section is floating above the floor, the floor is uneven in that area. A standard bottom seal handles minor floor variation by flexing. Major gaps (more than a quarter inch) on an uneven floor may need a threshold seal installed on the floor to compensate - the bottom seal alone won't bridge it.
Once contact looks good, plug the opener back in and run the door through two or three full cycles. Listen and watch. The seal should compress quietly and lift cleanly without dragging or squealing. If it drags noticeably and slows the door, the seal is either over-compressed (the retainer is set too low) or the wrong size for the gap.
Cold weather tip worth knowing
If you're doing this in winter and the rubber seal is cold and stiff, bring it inside for thirty minutes before installation. Cold rubber is rigid and fights the retainer channel on every inch. Room-temperature rubber is flexible and cooperative. This single step can cut your installation time in half on a cold day.
When DIY isn't the right move
Most bottom seal replacements are genuinely DIY-appropriate. But a few situations change that:
Your retainer is missing entirely or badly damaged - installing a new retainer requires drilling into the bottom of the door, getting the placement right, and ensuring the door closes without the retainer scraping the floor. If you've never done it, it's worth having someone show you or do it for you.
The door bottom is warped or bent - a bent door bottom means the seal will make contact in some places and not others regardless of which seal you install. The door panel needs straightening or replacement before a new seal will work.
The floor has a significant slope or crack running across the width - a threshold seal needs to be matched carefully to the floor profile and adhesively bonded. Done wrong, it creates a trip hazard and seals poorly. Professional installation here is often worth the $80 to $150.
The door itself isn't closing squarely - if one corner of the door is higher than the other, that's a spring tension or cable issue, not a seal issue. No bottom seal will compensate for a door that doesn't close level.
Ready to get your garage properly sealed? DoorFixy handles bottom seal replacements, retainer installations, and full weatherstripping service - usually in a single visit.
More DIY guides and maintenance advice on the DoorFixy blog - practical information for homeowners who want to understand what's happening with their garage door.